The article demonstrates how to use .NET Interactive Notebook in Visual Studio Code, including some code examples.
The tool is a descendant of the .NET Interactive and Jupyter Notebook. It’s a combination of APIs and CLI tools that lets users easily examine and work with .NET.
Generally, interactive notebooks (Jupyter, RStudio, .NET interactive notebooks) are useful for documentation, code learning, and trying out code ideas before implementing them in a project.
How to Install .NET Interactive Notebook
The.NET interactive notebook is incredibly easy to set up. Simply download and install the.NET Interactive Notebooks marketplace extension. Of course, you must ensure that the following installations are already in place:
- Visual Studio Code (see installation link)
- Install the latest version of the .NET 6 SDK.
How to Use the .NET Interactive Notebook
Hit the key combination Ctrl+Shift+P and select .NET Interactive: Create new blank notebook. Then you are invited to choose one of the options:
Create as '.dib'
Create as '.ipynb'
You can shorten these two steps by hitting the key combination:
Ctrl+Shift+Alt+N.
Let us select the option '.dib' and you will see the invitation for the selection of a language.
C#
F#
PowerShell
At this point, you only see three language options, but Interactive Notebook supports more, which you can see by clicking on the link in a code cell (e.g. C # (.NET Interactive)). We will discuss this feature below.
We are going to create a C# example. So, select C# and you should expect to see this window:

Take note of the two button groups:
- At the top left:
+Code, + Markdown, Run All. - At the top right corner: arrow up, arrow down, split cells, more actions, and delete.
Let us see what they do:
+ Code – click this button to add a code block to the work area. Initially, the first cell is created as a code cell.
+ Markdown – clicking this button adds a markdown cell at the notebook’s end.
Run All – clicking the button runs all the code blocks in the workspace.
Arrow up – click the up arrow icon to execute the previous cell.
Arrow down – press the down arrow icon to execute the next cell.
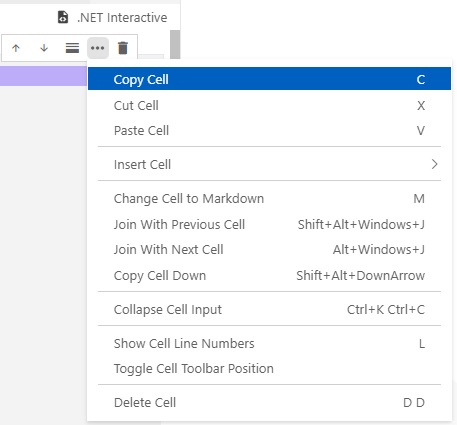
Split cells – click the icon to split a cell into two cells. The cell will be split at the cursor position.
More actions – use this button to open the menu with additional actions:

Delete – click on the garbage bin icon to remove the active cell from the workspace.
Note: when you edit a markdown cell, instead of the up and down arrows you see edit icon ( – activates cell editing) in the view state and the checkbox icon ( – stops cell editing) in the edit state.
Write Code and Markdown Text
Write simple code in the C# block:
int a = 10;
int b= 20;
Console.WriteLine($"a*b={a*b}");
Then click the + Markdown button to add a markdown cell at the notebook’s end. Finally, write in it the text "## C# Code Example".
Now you can drag the markdown cell above the code cell.
Select the code cell and create a markdown cell again. Then write in it: “JavaScript Code Example” and stop editing. After that, add the code cell. As a result, a C# (.NET Interactive) code cell is created. Finally, click on the button C# (.NET Interactive) and, from the opened menu, select JavaScript (.NET Interactive),
In the created cell write the code in the cell:
var a = 10;
var b = 20;
console.log(`a*b=${a*b}`);
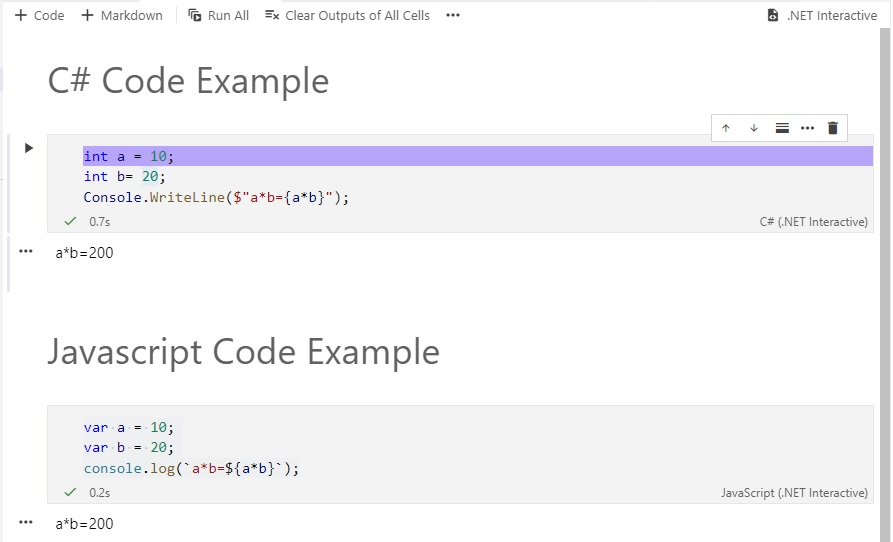
Finally, you can expect this result:

You can find some useful .NET interactive notebooks at the link.
Was this helpful?
2 / 0
[…] The article demonstrates the C# code examples with lambda expressions. As an illustration, they are done in the .NET interactive notebook installed in Visual Studio Code. To find out how to install and use it, follow the link. […]
[…] find out how to install and use the examples provided here, follow the GitHub link. Main positive feature of the interactive notebooks is their readiness to try/use […]