The article demonstrates how to send an email from an Excel workbook using VBA code.
Preface
Microsoft office applications reveal their true power when they work together and when they are integrated. Excel with Word, Excel with Outlook, Microsoft Teams, OneDrive, OneNote, or Microsoft To Do can do marvelous things.
Outlook is an awesome application that can do many useful tasks, but it’s too complex in some circumstances. That is when Excel comes to help with its clear, simple and powerful features. Big data is more readable as a table.
The application is done in Microsoft 365 Excel for demonstration purposes only, and consequently it is simple. Although you can send real emails with it using your Outlook account.
Create Workbook
Start Excel application.
Save the Excel workbook as SendEmail.xlsm.
Note: save the workbook as a *.xlsm file (not *.xlsx) because files with the xlsm extension are a type of spreadsheet file that supports VBA macros.
Rename Sheet1 as persons and make there the table with columns:
- Person: a name of the mail recipient;
- Email Address: an email of the mail recipient;
- Schedule Time: when send the email;
- CC: email copy recipient (“carbon copy”);
- BCC: “blind” email copy recipient (“blind carbon copy”), difference from the CC is that you ca not see BCC recipients in the list;
- Subject: a subject of the message;
- Content: message body.

Creating business logic by VBA
The section shows how to create the business logic to send the emails from an Excel workbook using VBA.
Enable the developer mode
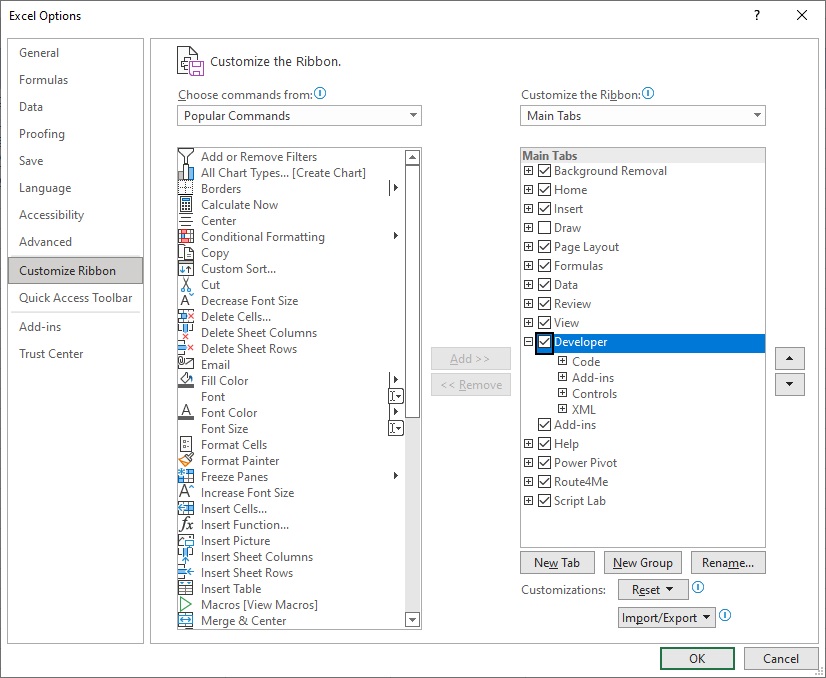
Working with the VBA macros requires allowing developer mode. Select the menu item Files > Options. Select Customize Ribbon in the resulting dialog window and check the Developer checkbox, as shown in the image below:
Install required libraries
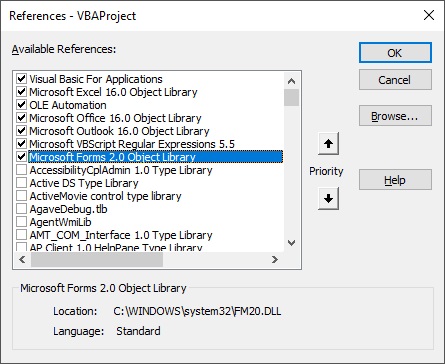
Enter into the VBA macros IDE by clicking Alt F11 (or by selecting Developer > Visual Basic). The application requires you to install some libraries. Select the menu item Tools > References… and select the following libraries to install:
Create a data model and the utility functions
Create the class clsPerson which reflects structure of the above mentioned table by selecting menu item Insert > Class Module.
Write the code in the class:
Private m_person As String
Private m_mail_address As String
Private m_schedule_time As String
Private m_cc As String
Private m_bc As String
Private m_subject As String
Private m_content As String

Property Get PersonName() As String
    PersonName = m_person
End Property

Property Let PersonName(value As String)
    m_person = value
End Property

Property Get MailAddress() As String
    MailAddress = m_mail_address
End Property

Property Let MailAddress(value As String)
    m_mail_address = value
End Property

Property Get ScheduleTime() As String
    ScheduleTime = m_schedule_time
End Property

Property Let ScheduleTime(value As String)
    m_schedule_time = value
End Property

Property Get CC() As String
    CC = m_cc
End Property

Property Let CC(value As String)
    m_cc = value
End Property

Property Get BC() As String
    BC = m_bc
End Property

Property Let BC(value As String)
    m_bc = value
End Property

Property Get Subject() As String
    Subject = m_subject
End Property

Property Let Subject(value As String)
    m_subject = value
End Property

Property Get Content() As String
    Content = m_content
End Property

Property Let Content(value As String)
    m_content = value
End Property
It’s time to create some functions to validate and read the “persons” data from the sheet. Select the menu item Insert > Module and in the created module, write the code:
Global PersonsSheet As Worksheet

Function RowToPerson(ByVal row As Long) As clsPerson
    Set RowToPerson = New clsPerson
    Set PersonsSheet = Worksheets("persons")

    With RowToPerson
        .PersonName = PersonsSheet.Cells(row, 1)
        .MailAddress = PersonsSheet.Cells(row, 2)
        .ScheduleTime = PersonsSheet.Cells(row, 3)
        .CC = PersonsSheet.Cells(row, 4)
        .BC = PersonsSheet.Cells(row, 5)
        .Subject = PersonsSheet.Cells(row, 6)
        .Content = PersonsSheet.Cells(row, 7)
    End With


End Function

Function validatePersonRow(ByRef person1 As clsPerson) As Boolean
    Dim errorString
    Dim objRegExp As New RegExp

    errorString = ""

    On Error GoTo Catch

    validatePersonRow = True

    If Len(person1.PersonName) < 1 Then
        validatePersonRow = False
        errorString = "Wrong person name"
        GoTo Catch
    End If

    If Len(person1.MailAddress) < 1 Then
        validatePersonRow = False
        errorString = "Wrong email address"
        GoTo Catch
    End If

    Exit Function

Catch:
    validatePersonRow = False
    If Len(errorString) < 1 Then
        MsgBox "Module: " & MODULE_NAME & " - validatePersonRow function" & vbCrLf & vbCrLf _
        & "Error#:  " & Err.Number & vbCrLf & vbCrLf & Err.Description
    Else
        MsgBox errorString
    End If


End Function
Create a user form
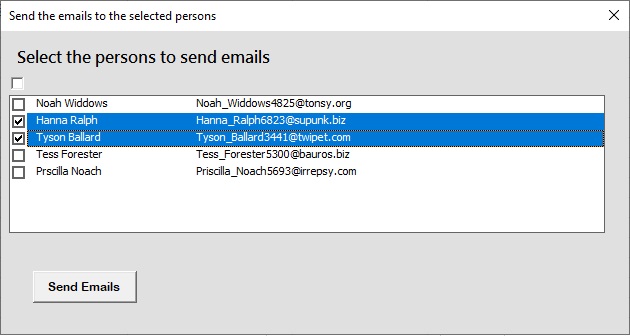
We need a dialog form to select mail recipients from the table. Select the menu item Insert > UserForm and place these controls on the form:
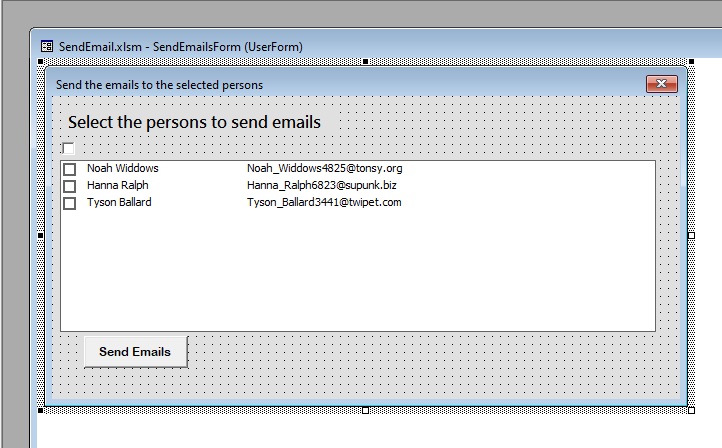
To make the listbox as it is shown above, set its properties as:
ColumnHeads: False
ColumnWidths: 120 pt;300 pt
ListStyle: 1 - fmListStyleOption
MultiSelect: fmMultiSelectMulti
RowSource: persons!persons_data
Double click on the button Send Emails and you will see the open code editor. Put the code below in it:
Private Sub btnSendEmails_Click()
    Dim Email As Outlook.Application
    Dim NewEmail As Outlook.MailItem

    Dim Person As clsPerson
    Dim currentPerson As clsPerson

    Dim valid As Boolean
    Dim LR As Long

    Dim PersonName As String
    Dim MailAddress As String

    Set Email = New Outlook.Application

    Application.Wait Time + TimeSerial(0, 0, 1)

    Set NewEmail = Email.CreateItem(olMailItem)

    Set PersonsSheet = Worksheets("persons")

    LR = Cells(Rows.Count, 1).End(xlUp).row

    For i = 0 To Me.lbPersons.ListCount - 1
        If Me.lbPersons.Selected(i) = True Then
            Set currentPerson = RowToPerson(i + 2)

            valid = validatePersonRow(person1:=currentPerson)
            If valid = False Then
                GoTo nexti
            End If

            With NewEmail
                .To = currentPerson.MailAddress
                .Subject = currentPerson.Subject
                .CC = currentPerson.CC
                .BCC = currentPerson.BC
                .Body = currentPerson.Content
                .Send
            End With
            MsgBox (Me.lbPersons.List(i))
        End If
nexti:
    Next i

End Sub

Private Sub chkAllPersons_Click()

    For i = 0 To Me.lbPersons.ListCount - 1
        Me.lbPersons.Selected(i) = Me.chkAllPersons.value
    Next i
End Sub

Private Sub UserForm_Activate()
    Dim LR As Long

    Set PersonsSheet = Worksheets("persons")
    LR = PersonsSheet.Cells(Rows.Count, 1).End(xlUp).row

    lbPersons.RowSource = "persons!A2: B" & LR
End Sub
Take note of the checkbox at the top-left corner of the listbox. It is designed to select/unselect all the items in the listbox at once. Double click on it and write in the code editor:
Private Sub chkAllPersons_Click()

    For i = 0 To Me.lbPersons.ListCount - 1
        Me.lbPersons.Selected(i) = Me.chkAllPersons.value
    Next i
End Sub
In the same code editor select UserForm and Activate in the top element and handler selectors and write the code:
Private Sub UserForm_Activate()
    Dim LR As Long

    Set PersonsSheet = Worksheets("persons")
    LR = PersonsSheet.Cells(Rows.Count, 1).End(xlUp).row

    lbPersons.RowSource = "persons!A2: B" & LR
End Sub
Complete and launch the application
Open the sheet persons, select the tool panel Developer, and from the tool Insert, insert the button in the sheet:
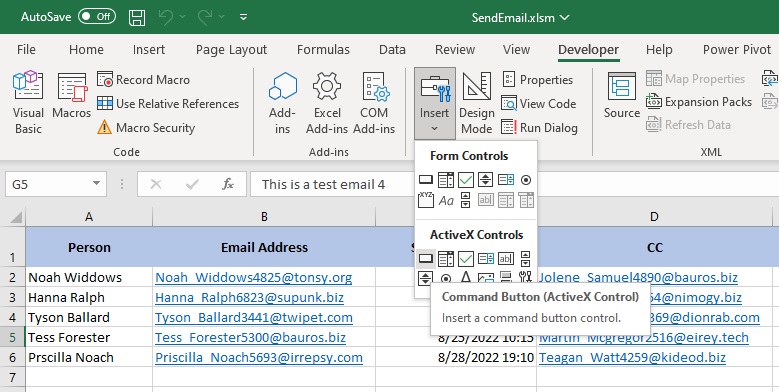
After inserting the button, click on the tool Design Mode, then right click on the created button and design the button (using the menu items: Edit Text, Format Control…) as it is shown below:
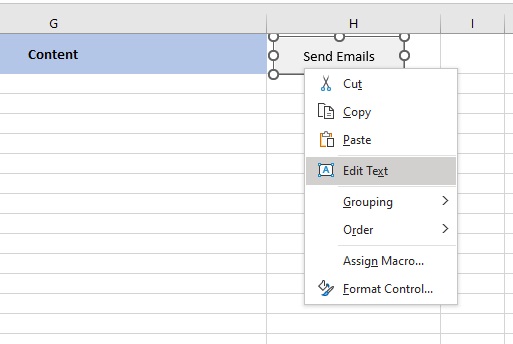
Finally click on the menu item Assign Macro… and assign the macro previously written after selecting View Code tool on the toolbox:
Sub SendButton_Click()
 SendEmailsForm.Show
End Sub
After finishing all the work, click on the button and.. congratulation! You can send your emails from your Outlook account. Select emails in the form to send and click on the button Send Emails:
Was this helpful?
2 / 0