The article demonstrates how to create a new Node.js server project using Express with both methods: standard and Pug.
Node.js Express is a minimal and flexible Node.js web application framework (see link). A web developer’s first choice is fast, unopinionated, and has a large community, so it’s an excellent choice. The Express’s learning curve is very low, and it has a wide range of modules and middleware to choose from.
Create Standard Express Project
Make sure you have done all the necessary Node.js installations. Find out how to install Node.js at the link.
Create a folder for the Express project, e.g., express-project. Enter the folder and run a CLI tool.
From the CLI tool run the command to install the Express package:
npm install -g express-generatorThe preceding command saves the installation to the node modules directory on the project folder.
Then, in addition to Express, install the following critical middlewares:
- Cookie parser, which parses Cookie header and populate
req.cookieswith an object keyed by the cookie names:
npm install cookie-parser --save- Body parser, which is a node.js middleware for handling Raw, JSON, Text and URL encoded form data:
npm install body-parser --save- Multer, which is This is a node.js middleware for handling multipart/form-data:
npm install multer --saveCheck out Express options:
express -hOccasionally, Windows policy prohibits the execution of scripts. In this case, you can run the following command to enable script execution:
Set-ExecutionPolicy -Scope LocalMachine UnrestrictedCreate a file named express-server.js and write the following code in it:
const url = require('url');
var express = require('express');
var app = express();
app.get('/', function (req, res) {
const queryObject = url.parse(req.url, true).query;
res.send(`The word <strong>${queryObject.word}</strong> was sent`);
})
var server = app.listen(8088, function () {
var host = server.address().address
var port = server.address().port
console.log("Example app listening at http://%s:%s", host, port)
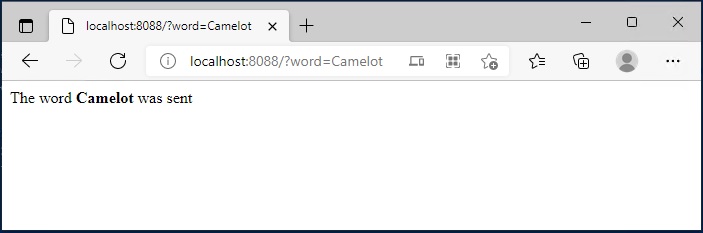
})The server application creates a server listening on port 8088, parses the request URL and outputs the request parameter value to the browser’s window.
Execute the CLI command to run the server:
node express-server.jsCheck the application output by entering in a browser the address:
http://localhost:8088/?word=CamelotThe browser’s window show the result:
Check the application output by entering in a browser the address:
Create Express Project with Pug
You can create an Express project with a Template engine. Some popular template engines that work with Express are Pug, Mustache, and EJS.
We are going to create an Express project using Pug.
Run the following command to install the Pug template:
npm install pug --saveExecute the CLI command to create an Express project in a folder:
express --view=pug myappThe folder myapp is created with the project structured folders and files:
PS C:\pug-project> express --view=pug myapp

   create : myapp\
   create : myapp\public\
   create : myapp\public\javascripts\
   create : myapp\public\images\
   create : myapp\public\stylesheets\
   create : myapp\public\stylesheets\style.css
   create : myapp\routes\
   create : myapp\routes\index.js
   create : myapp\routes\users.js
   create : myapp\views\
   create : myapp\views\error.pug
   create : myapp\views\index.pug
   create : myapp\views\layout.pug
   create : myapp\app.js
   create : myapp\package.json
   create : myapp\bin\
   create : myapp\bin\www

   change directory:
     > cd myapp

   install dependencies:
     > npm install

   run the app:
     > SET DEBUG=myapp:* & npm start
Let us follow the code output’s advice and perform the following:
- Change directory and install dependencies:
cd myapp
npm install- Set environment parameter and launch the server:
SET DEBUG=myapp
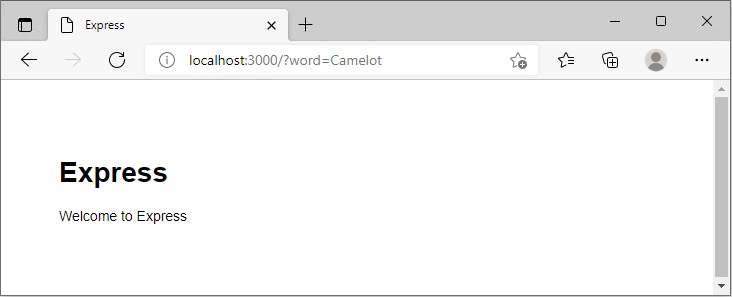
npm startType in a browser’s address field http://localhost:3000/?word=Camelot and you expect to see this result:
Was this helpful?
1 / 0