The article explains how to deploy an ASP.NET web API project to AWS Lambda in a step-by-step manner. The demo project was created on the basis of the Open Weather API.
About AWS Lambda
AWS Lambda is a server-less event-driven compute service that lets you run code for any type of application or backend service without managing servers. You can trigger Lambda from over 200 AWS services and software as a service (SaaS) applications.
AWS has created a proxy class, Amazon.Lambda.AspNetCoreServer, which takes care of everything in front of ASP.NET.
To learn how to sign up for AWS, follow the link.
Create an ASP.NET Web API Hosted on AWS Lambda
Project Requirements and Plan
First of all, let us figure out what should do the project.
We are going to make ASP.NET web API project which will return current weather for a specified city.
Let us get weather information using the OpenWeather API. and return the weather information in the custom format. For this task, we need only one endpoint. It accepts a city name as a string:
/v1/getCurrentWeather/?city={city}Successful Response example:
{
  "temperature": "14.51 °C",
  "weatherConditions": "Clear",
  "wind": "1.54 km/h",
  "windDirection": "W (West)",
  "pressure": 1015,
  "humidity": 75
}
The web API will be deployed to AWS Lambda. We will use AWS access and secret keys as the credentials.
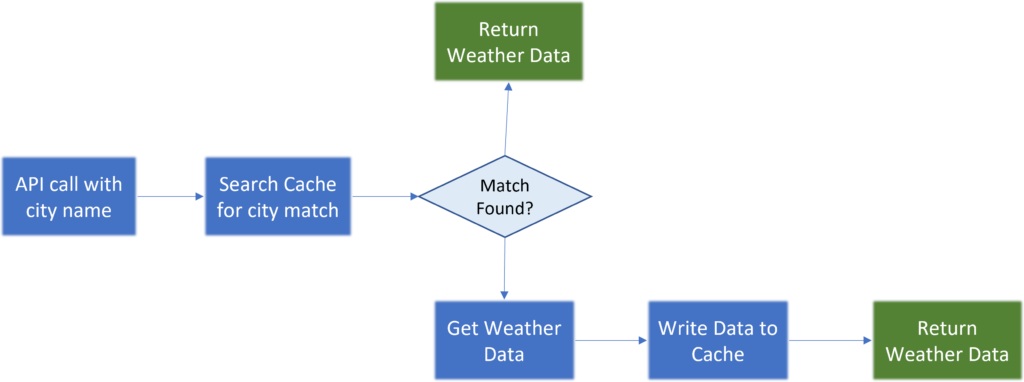
In order to avoid retrieving the same city’s weather many times from the OpenWeather API, we will use the Amazon ElastiCache for Memcached service. Let’s set a time-based cache policy for city weather information and specify an expiration time of 60 minutes.
In summary, we have the following logic block diagram:
The project will be done in Visual Studio Community 2022.
Prerequisites
The project requires to have:
- Visual Studio 2022 (follow the link to find how to download and configure it).
- .NET 6
- AWS Account and access to the services: Lambda, Elastic Cache, Secrets Manager.
- AWS Toolkit for Visual Studio
- OpenWeather API key.
- Docker Desktop
Create The ASP.NET Web API Project
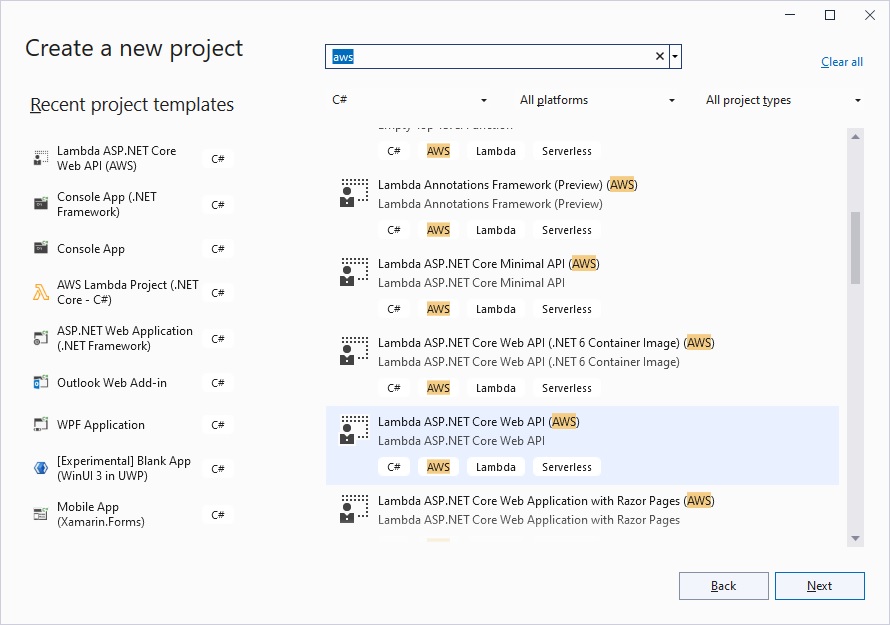
Start Visual Studio and click on the button “Create a new project“. Then type “aws” in the next window’s search box, select the project template “Lambda ASP.NET Core Web API (AWS)” and click on the button “Next“:
The next step requires you to enter the project’s configuration information:

Finally, in the next appearing window, enter your AWS profile and region and click on the button “Create“:
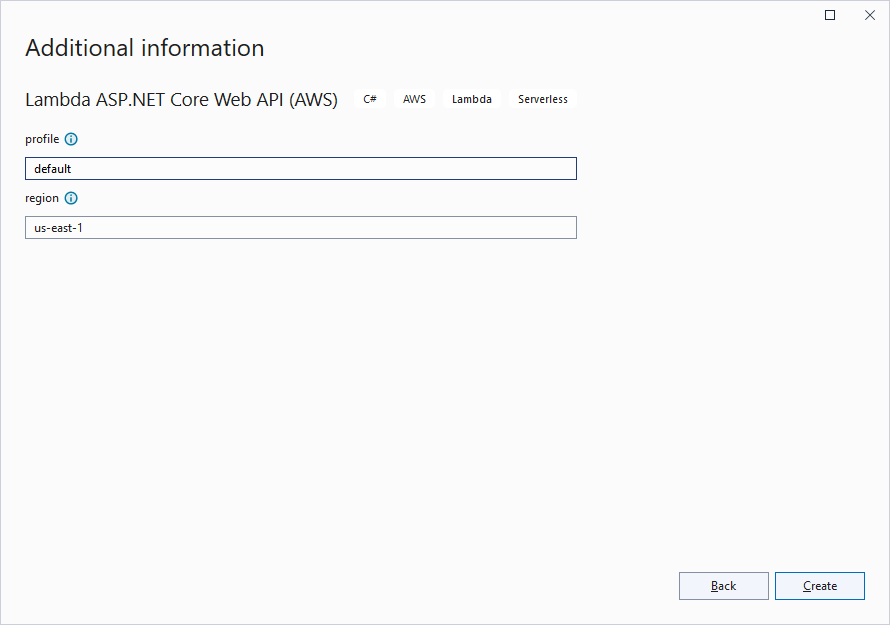
Congratulation! You created the ASP.NET web API project, ready to deploy on AWS Lambda.
Add Code To the Project
But wait! We should add a few files and code in order to implement our above described plan.
First of all, the project requires the necessary packages to work, which we are going to obtain on NuGet. The easiest way to add the NuGet packages is to manually add the references to them into the project file (select the project in the solution explorer and you will see it). Add this section to it:
 <ItemGroup>
    <PackageReference Include="Amazon.Lambda.AspNetCoreServer" Version="7.2.0" />
    <PackageReference Include="Amazon.Lambda.AspNetCoreServer.Hosting" Version="1.3.1" />
    <PackageReference Include="AWSSDK.ElastiCache" Version="3.7.7.18" />
    <PackageReference Include="AWSSDK.SecretsManager" Version="3.7.2.84" />
    <PackageReference Include="EnyimMemcachedCore" Version="2.5.4" />

    <PackageReference Include="Swashbuckle.AspNetCore" Version="6.2.3" />
    <PackageReference Include="Newtonsoft.Json" Version="13.0.1" />
 </ItemGroup>
Then build the project and the process will install all the packages automatically.
The next important file of the project is Startup.cs. Open it and add the code below to the appropriate methods:
public void ConfigureServices(IServiceCollection services)
{
	services.AddScoped<IAmazonSecretsManager>(a =>
		new AmazonSecretsManagerClient(RegionEndpoint.USEast1)
	);

	services.AddEnyimMemcached(memcachedClientOptions =>
	{
		memcachedClientOptions.Servers.Add(new Server
		{
			//Address = "*****.***.cfg.use1.cache.amazonaws.com",
			Address = "127.0.0.1", // This is a test local address.
			Port = 11211
		});
	});

	services.AddControllers();

	// Configuring Swagger/OpenAPI
	services.AddEndpointsApiExplorer();
	services.AddSwaggerGen();

	services.AddAWSLambdaHosting(LambdaEventSource.HttpApi);
}
public void Configure(IApplicationBuilder app, IWebHostEnvironment env)
{
if (env.IsDevelopment())
{
app.UseDeveloperExceptionPage();
app.UseEnyimMemcached();
app.UseSwagger();
app.UseSwaggerUI();
}
app.UseHttpsRedirection();
app.UseRouting();
app.UseAuthorization();
app.UseEndpoints(endpoints =>
{
endpoints.MapControllers();
endpoints.MapGet("/", async context =>
{
await context.Response.WriteAsync("Welcome to running ASP.NET Core on AWS Lambda");
});
});
}The above code adds AWS services and configuration to the project.
You can find other project files in the GitHub repository asp.net-webapi-aws-lambda. Particularly, pay attention to the files:
- /Controllers/ getCurrentWeatherController.cs: the main controller with business logic;
- /Controllers/SecretController.cs: the controller to store and retrieve AWS credentials to/from AWS Secrets Manager;
- /Helpers/ElasticCacheHelper.cs: the helper file for the Amazon ElasticCache operations;
- docker-compose.yaml: the Docker compose file to create the AWS Memcahed service in the locally installed Docker.
The folder Models contains the models (classes) for the API request/response operations.
Launch The Project WeatherLambdaApi2
To launch the project, click on the small green triangular button. The endpoint https://localhost:61932/ is ready to receive requests from the client applications.
But prior to consuming the endpoint, you need to enter credentials. Use the Swagger interface. Enter https://localhost:61932/swagger/ into your browser and you will see the following window:
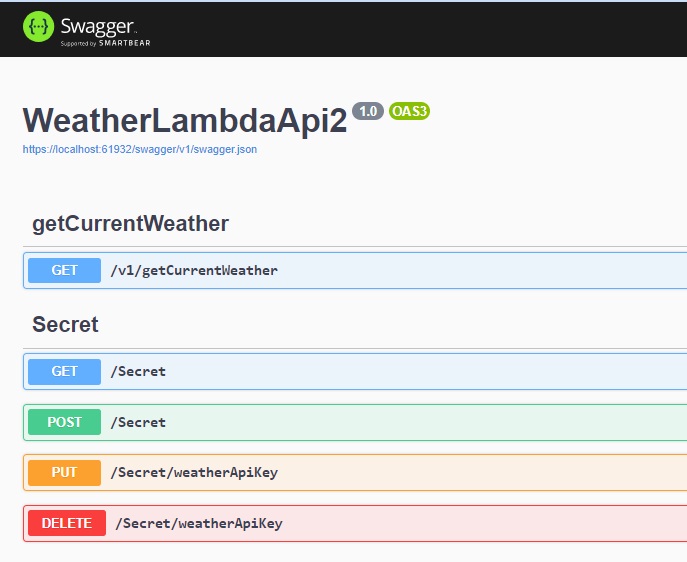
Expand the node “POST /Secret” and enter your OpenWeather API key. Then expand the node “GET /Secret” and check if the API is saved. You can expect to see this value:
{
  "secret": "CBXR53lyfkBXItdfAu6f2cKhdxbweFOI"
}
Also, before deploying the project to AWS, while testing on your local PC, you must navigate to the project’s root folder and run the CLI command to make AWS Elastic Memcached available locally:
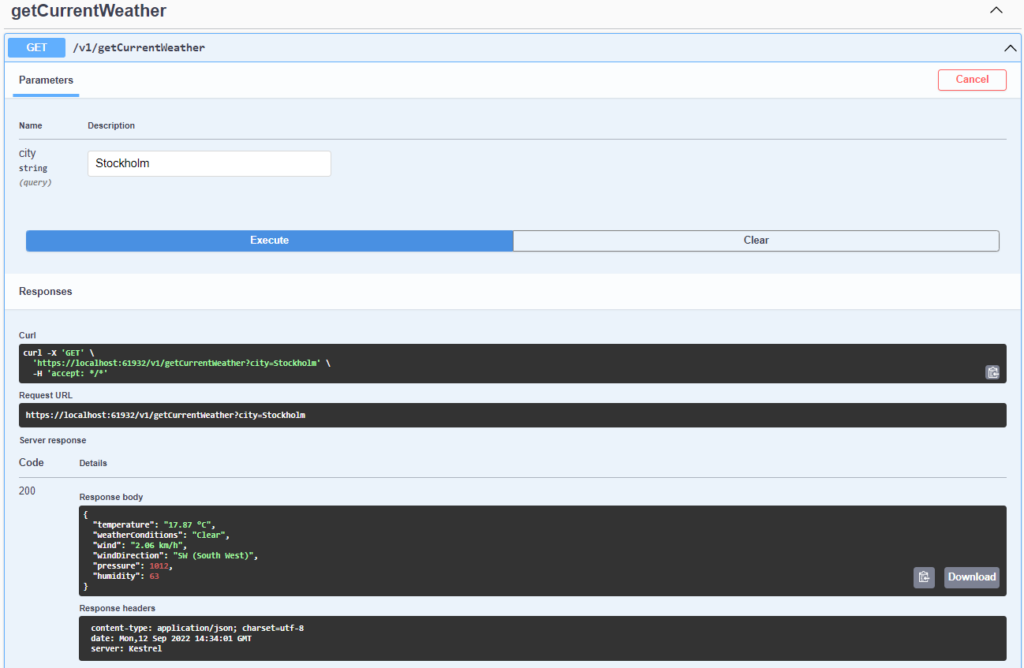
docker composeFinally, after all, you can test the getCurrentWeather endpoint in the Swagger interface and we have good news for you. Now you can get current weather info for any city in the world:
Was this helpful?
1 / 0